Mostrando entradas con la etiqueta gifts. Mostrar todas las entradas

domingo, 16 de febrero de 2014

Personaliza tu boda / Have a personalize wedding


Hola de nuevo a todos/as,
Como ya sabéis por publicaciones anteriores que hace unos meses nos casamos y es por esto por lo que estoy haciendo varias entradas relacionadas con bodas.
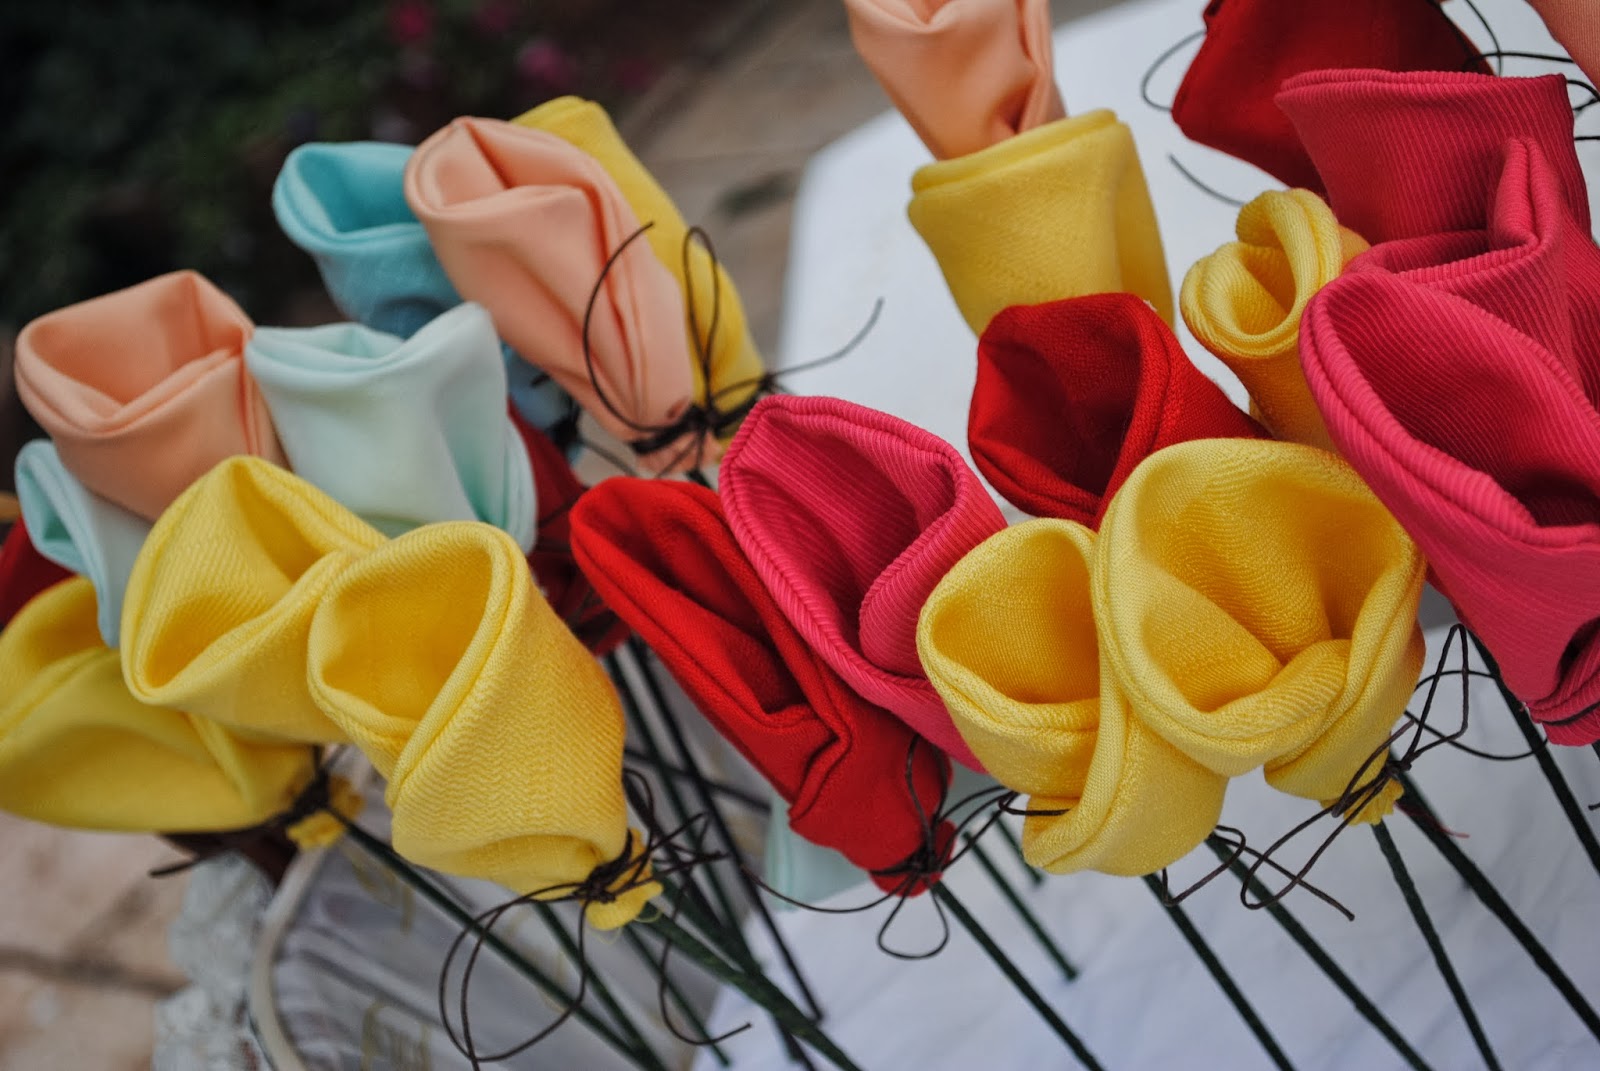
En la entrada de hoy os muestro una alternativa original para el arroz. Al igual que hice con las latas para mostrar los regalos para los invitados. Son unas sencillas flores de tela que yo misma realicé y aquí os muestro el paso a paso en fotos.
Espero que os guste.

Hello everyone,
As you know from previous post, I got married a few months ago, adn that's why I'm writing about weddings in several of my entries.
Today's post is about my own wedding. Like the previous post in which I showed you how I used cans to show the our wedding favor, today I'm showing you a good idea for the rice, as in Spain we throw rice to the brand new married cuople. These are easy-to-do cloth flowers which held the rice inside. Here you have the step-by-step pictures.
Hope you like it.

Materiales:
- Tela (con dos metros salen alrededor de 20 flores)
- Tijeras
- Maquina de coser
- Palitos de pinchito
- Cinta de enmarcar (de venta en tiendas de cuadros)

Materials:
- A piece of cloth (with 2 mettres you get about 20 flowers)
- Scissors
- Sewing machine
- Brochette sticks
- Tape


Lo primero que haremos será dibujar sobre la tela unos círculos. Para ello, yo previamente hice una plantilla en cartón.

The first thing to do is to draw circles on the cloth. To do that, I previously made a pattern.


Cortamos los círculos. Aconsejo que los cortéis mejor en cuadrado que de forma circular, ya que resulta más fácil.

Cut the circle. I recommend you to cut them more like a square, it would be easier for you.


Doblamos el cuadrado que hemos cortado haciendo coincidir las líneas de nuestro círculo y obtendremos media circunferencia.

Bend the square of cloth. You'd get a semi-circle.


Ahora toca coser. Coseremos con la máquina por los bordes del círculo. No coseremos hasta el final, puesto que estamos cosiendo el interior, tenemos que dejar un huequito para poder darle la vuelta.

Now it's time for sewing. You're not going to sew the whole circle. It's needed to leave a space at the end, in order to be able to turn it over.


Cortamos el exceso de tela.

Cut the extra cloth.


Debe quedarnos algo así. Y hay que rematar el final para que quede bonito.
Una vez hecho esto, tendremos que coser la parte recta con un hilván, con el que después rizaremos la parte de abajo de la flor.

You'll get something similar to this. You need to sew the edge in order to get it nicer.
Once you've done this,it is necessary to sew a basting at the straight part wich will help us to curl the bottom of the flower.


Como veis los palos de los pinchitos van envueltos en la cinta que os comenté antes.

You need to wrap the sticks with the tape.


Éste fue el resultado. Las flores clavadas en corcho y presentadas en una cesta. El arroz iba dentro de los capullos.
Los invitados lanzaron el arroz y pudieron conservar las flores como recuerdo.

This was the final result. Rice was inside the flower-bud.
Our guests threw the rice and could keep the flower as a souvenir.


lunes, 15 de julio de 2013

Despedida de soltera / "Bridal Shower"

¡Hola a todos!
Este fin de semana será mi despedida de soltera :-D. Aún no sé dónde me llevan mis amigas, pero la verdad es que ya estoy impaciente.
Sé que se han tomado muchas molestias preparándola y me ha apetecido tener un detalle simbólico con ellas. Y como ya sabéis que el DIY me vuelve loca, pues no podía ser de otra manera y les he preparado unos regalillos hand-made.

Hi everyone!
This weekend I'm having my "Bridal Shower", well it's not exactly an authentic Bridal Shower, but it's the Spanish way. The bride friends' prepare a day or a couple of days on which they make the bride to wear a fancy costume or make her achieve some challenges.
I don't still know where my friends are taking me, but I'm anxious and looking forward it!.
I'm sure, they've worried a lot preparing everything, and so I've though about making them a nice present. As you already know, DIY drives me crazy, and I've prepared some hand-made gifts.


Así es como he envuelto el regalito.

This is the way I wrapped the present


Y esto es lo que había en su interior. Una bolsita de semillas para calentar en el microondas, hecha por mí, y un tarrito de cristal con gominolas dentro y una frase que me parecía la más apropiada: 
Los buenos amigos son como las estrellas, no siempre los ves, pero siempre están ahí.

And inside the parcel there are a seeds-bag, made by me. You heat it in the microwave. And a small jar filled with sweets. The jar has a nice sentence on it:
Good friends are like stars, you don't always see them but they're always there.

jueves, 18 de abril de 2013

Día de la Madre II / Mother's Day II

Ya estamos a mediados de Abril y no queda casi nada para el día de la madre. Como ya os dije en la entrada anterior sobre el día de la madre, hoy os vuelvo a dejar unas cuantas ideas originales y baratas para que sorprendáis a vuestras madres.

We've already reached mid April and Mother's Day is about to come. As I told you on the previous post about Mother's Day, today I'm also giving you sme tips to give your mum a original and cheap gift.


No sé si vuestra madre es una amante de los bolsos, la mía lo es, y estoy segura de que este organizador de bolsos fácil de hacer, le encantaría.

I don't know if your mum is a bag lover, mine is, and I'm sure she'd love this  easy to make bag organizer.


Este regalo es súper sencillo y a la vez es de lo más personal. Usando unos cuantos folios y algunas de nuestras fotos más emotivas podemos conseguir esta preciosa libretita para apuntar todas las citas.

This is a very very easy gift and at the same time it can be very personal. Using some paper sheets and some of our favourite pictures we can make this nice notebook to write down all our dates.


¿Le encanta leer? ¿Qué te parecen estos lindos marcapáginas?

Does she love reading? What about giving her this nice reading point? 


Todos tenemos un montón de llaves en casa que en realidad no sabes qué abre. Puedes adornarlas para hacer con ellas estos lindos collares o darles otros usos que se te ocurran.

We all have keys around and you really don't know what they open. You can decorate them and make these nice collars or give them any other use.


viernes, 5 de abril de 2013

Regalos para el Día de la Madre I / Gifts for Mother's Day I

Como cada año se acerca el día de la Madre, y a todos nos gusta tener un detalle con la persona que nos trajo al mundo, pero claro, tal y como está la vida, las noticias que escuchamos a diario, la verdad es que la cosa no está como para hacer grandes gastos. Afortunadamente, ellas, que son las que más nos quieren en este mundo, se conforman con bastante poco, la mía simplemente con que vaya a verla :-P. Bueno, pues hoy os traigo algunas ideas que además de ser bonitas les encantarán porque las habremos hechos nosotros. ¿Os atrevéis?

As every year, Mother's day is about to come, and we all like to have a gift to the person who gave us birth. But as life is going on, all the bad news about the crisis, we don't think about spending a fortune. Fortunately, they, who are the people who love us the most, are really easy to make them happy, mine just wants me to visit her :-P. Well, today I'm showing you some nice ideas which your mum will love, and at the same time you'll save money as you can make them yourselves!

Hoy os voy a mostrar algunos regalos de bisutería, que podéis regalas a las madres o alguna amiga que cumpla años.

Here you have some ideas of jewelry, which you can give to your mum or anyone else.


Con unas botellas de plástico y un poco de tela, podemos hacer estas preciosas pulseras

Using plastic bottles and some fabric we can make these nice bracelets.


Esta idea es preciosa. Con un trozo de tela, puede ser una camiseta vieja, cortamos tiras y le colocamos algunas bolitas. El resultado es un maxi-collar que quedará divino con camisetas básicas.

I love this idea. With a sheet of fabric, it could be an old T-shit, we cut it in bands and add some beads. This way you have a maxi-necklace which will look great with a basic T-shirt.


Estas dos imágenes se pueden combinar y hacer un conjunto de brazalete y gargantilla. Es tan simple como utilizar imperdibles y añadirle pequeñas cuentas. Después sólo tendremos que unir los imperdibles mediante una cinta o una gomilla. Queda presioso y no se sabe de qué están hechos.

These two images can make a nice couple for a gift. A bracelet and a necklace make out od safety pins and beads. After putting all the beads on the safety pins, we need a ribbon to join all the safety pins and voilá you've got a nice collar and bracelet. 


Para este último proyecto quizás necesites algo más de paciencia. Consiste en un maxi-collar Necesitarás: papel, sobre el que sacarás el patrón del collar, un trozo de fieltro, que cortaremos de la misma forma que el patrón de papel, y algunas perlas, que irán pegadas al fieltro. Para terminar anudaremos nuestro collar con un trozo de lazo.

For this project you need some more patience. It consists on a maxi-collar. You'll need some paper, to make the pattern, then some felt, on which you'll cut the same shape as the pattern, and some pearls, they can come from a long necklace. To end the project you'll also need some ribbon to tie it around your neck.

ESPERO QUE OS HAYAN GUSTADO ESTAS IDEAS. PRONTO OS ENSEÑARÉ OTRAS.

I HOPE YOU'VE LIKED THESE IDEAS. SOON I'LL SHOW YOU SOME MORE.

miércoles, 3 de abril de 2013

Tarta de pañales para Nachito / Diaper cake for Nachito

En mi familia estamos esperando la llegada del pequeño Nachito y pensando qué podía regalarle, se me ocurrió hacer una tarta de pañales. De esta manera conseguía dos cosas: un regalo original y útil y una entrada para mi blog :-D.
Así que hoy os traigo el paso de paso para hacer una tarta de pañales y el resultado final. Espero que os guste.

We are waiting for little Nachito, and as I was thinking about his welcome present the idea of a diaper cake came to my mind. And so, I got two goals: a nice and useful present for Nachito, and a new post for my blog.
And here you've got the steps to make the diaper cake and the final outcome.

¿Que necesitas?
- Un paquete de pañales
- Una base para tarta (o un círculo hecho de cartulina)
- El tubo de cartón de un rollo de papel de cocina
- Gomas
- Cinta adhesiva
- Cintas para regalo o de lazo.
- Papel celofán

What do you need?
- Diapers (I used 80)
- A cake tray (one made out of cardboard)
- The cardboard tube from a paper towel roll
- Rubber bands
- Tape
- Ribbons
- Cellophane


Lo primero que tenemos que hacer es enrollar los pañales. Y los sujetaremos con las gomas. Lo ideal es ponerlas hacia la mitad, ya que después las ocultaremos con la cinta decorativa.

First of all, you have to roll the diapers. We'll hold them using the rubber bands. Try to put them in the middle, in order to hide them later using the ribbons.


 Una vez que ya tenemos todos los pañales enrollados, cogeremos el rollo de cartón de papel de cocina y lo uniremos a la bandeja de cartón. Yo lo forré con un folio blanco para que quedara algo más bonito

Once we've rolled all the diapers, we have to join the cardboard roll and the cardboard tray. I've wrapped the tube with white paper in order to get it nicer. 


Ahora es el momento de rellenar la bandeja con los pañales enrollados. Hay que ir colocándolos alrededor del rollo de cocina. Yo usé 68 pañales para la primera capa. Uniremos los pañales usando una de las cintas decorativas.

Now, it's time to fill the try by putting all the rolled diapers around the paper tube. I've used 68 diapers for the first layer. And you have to join them using one of the ribbons.


Una vez que hayamos completado la primera capa, haremos lo mismo con la capa de arriba, aunque esta vez será más pequeña. mi segunda capa sólo tiene 12 pañales, aunque después le añadí 6 bodies enrollados de la misma manera que los pañales. Cuando terminéis la capa de arriba pondremos más cinta decorativa para unir los pañales.

Once you've filled the first layer, you've got to do the same with the top layer, but this time it'll be smaller.My top layer got only 12 diapers, but later I added 6 bodies rolled as the diapers. As soon as you finish the top layer, you have to join the diapers with some more ribbon.


Estas fotos muestran como queda una vez que ya hemos hecho las dos capas de la tarta y además hemos colocado los diferentes regalitos que queremos añadir.

These pictures show the cake once we've got all the diapers set and we've put all the gifts we want to add.


Después rodee la capa superior de la tarta con una mantita. Algunos de los regalitos que añadí son unas perchas, un sonajero, un biberón, un porta alimentos, dos pares de calcetines, unos bodies, una cucharita, un gorrito y unas manoplas.

Later I wrapped the top layer using a small blanket. I've also added some presents as I told you before, such  as some hangers, a little spoon, some bodies, a rattle, a baby botle, two pairs of shocks, a small hat and gloves.


¡Tachán! Este es el resultado final. Una vez envuelta con el papel de celofán y una lazada en la parte superior. Espero que os guste y que os pongáis manos a la obra para hacer vuestro regalo.

Here we are! Once wrapped with cellophane paper I tied some ribbon at the top. I hope you liked it and now you're thinking about doing one yourself.

sábado, 9 de marzo de 2013

Regalos / Gifts

¿Tienes que hacer un regalo y con los tiempos que corren tienes poco presupuesto?
Hoy te traigo varias ideas de regalos bonitos, baratos, originales y lo mejor de todo, con mucho amor ya que ¡serán hechos por ti!
Échale un vistazo a las fotos que te muestro.

Are you thinking about giving a present but you've run out of money? Today I'm bringing several ideas of beautiful, original, cheap and over all made with love presents, because they'll be made by you!
Have a look at these pictures.


Tableta de chocolate de fresas. Sólo necesitas unas fresas, chocolate derretido y una cubitera. ¿Quién puede resistirse?

Strawberry chocolate bar. All you need is strawberries, melted chocolate and ice-shape. Everyone will love this hand made with love gift.


¿Qué te parece esta original pulsera? Y como ves es súper sencilla de hacer. Ya no puedes poner excusa de que no te ha dado tiempo de comprar un regalo ;-)

What do you think about this nice bracelet? As you can see it's very easy to be made. There's no excuse for going to a birthday without a gift ;-)


Si tienes una celebración y quieres sorprender a tus invitados con un detalle, estás galletas con chips de chocolate envueltas en papel de regalo encantarán a tus amigos.

If you have a party and want your guests to be surprised, give them these chocolate chips cookies wrapped in colour paper. Lovely!


domingo, 3 de marzo de 2013

Gift packaging / Envolviendo regalos

No sé si os ha pasado que a veces has comprado un regalo genial, pero a la hora de envolverlo... el resultado no era el esperado y el envoltorio no hace justicia al contenido, pues bien, hoy os traigo algunas ideas súper sencillas para envolver regalos de la manera más original y barata.

Haven't you bought a really great gift but the packaging wasn't good enought? Today I'm bringing you some ideas to make your gift packaging great and even cheap.


Algo tan simple como una bolsa de papel, pero con algo de decoración puede quedar espectacular.

A paper bag with some decoration will be charming and great!


El papel continuo puede ser una gran solución a la hora de envolver muchos regalos. Simplemente con la aplicación de algunos detalles como encajes o cintas y haremos que nuestros regalos sean preciosos.

Wrapping paper can also be very nice just adding some original details such as those on the pictures. I love the one with lace and ribbons!


¿Has pensado alguna vez en utilizar papel de periódico como envoltorio para un regalo? Mira este ejemplo. Con una simple cinta o lazo bonito y un alfiler puedes conseguir este maravilloso efecto.

And what about newspaper? There isn't anything cheaper adn easiest to find. Look at this example. A nice ribbon and a pin, and you've got it!

Por último, os dejo el enlace de un tutorial en Youtube para hacer cajitas de papel, es sencillísimo y te puede sacar de un apuro.

And last, I leave you a link of a Youtube tutorial to make little paper boxes. It's very easy and nice.

http://www.youtube.com/watch?v=MqDBC_KqXV0

HAVE A NICE WEEK!