lunes, 15 de julio de 2013

Despedida de soltera / "Bridal Shower"

¡Hola a todos!
Este fin de semana será mi despedida de soltera :-D. Aún no sé dónde me llevan mis amigas, pero la verdad es que ya estoy impaciente.
Sé que se han tomado muchas molestias preparándola y me ha apetecido tener un detalle simbólico con ellas. Y como ya sabéis que el DIY me vuelve loca, pues no podía ser de otra manera y les he preparado unos regalillos hand-made.

Hi everyone!
This weekend I'm having my "Bridal Shower", well it's not exactly an authentic Bridal Shower, but it's the Spanish way. The bride friends' prepare a day or a couple of days on which they make the bride to wear a fancy costume or make her achieve some challenges.
I don't still know where my friends are taking me, but I'm anxious and looking forward it!.
I'm sure, they've worried a lot preparing everything, and so I've though about making them a nice present. As you already know, DIY drives me crazy, and I've prepared some hand-made gifts.


Así es como he envuelto el regalito.

This is the way I wrapped the present


Y esto es lo que había en su interior. Una bolsita de semillas para calentar en el microondas, hecha por mí, y un tarrito de cristal con gominolas dentro y una frase que me parecía la más apropiada: 
Los buenos amigos son como las estrellas, no siempre los ves, pero siempre están ahí.

And inside the parcel there are a seeds-bag, made by me. You heat it in the microwave. And a small jar filled with sweets. The jar has a nice sentence on it:
Good friends are like stars, you don't always see them but they're always there.

miércoles, 3 de julio de 2013

STAND BY

El título de esta entrada me viene como anillo al dedo, porque así es como tengo ahora mismo el blog, en stand by. No es que lo haya abandonado, sino que estoy liada y por eso no subo cosillas. Me caso en tres meses y es por esto por lo que no escribo, porque estoy liada haciendo y preparando cosas para la boda. Como os podéis imaginar habrá algunas cosillas hand made en dicha celebración, así que cuando pase el evento os mostraré todas las manualidades que estoy haciendo con sus correspondientes paso a paso.
Pues nada lo dicho: VOLVERÉ.

As the title of this post says I'm on stand by. This doesn't mean that I've left the blog appart, but instead it means that I'm doing other things and I can't spend some time on it. I'm getting married in 3 months time, and so I'm quite busy preparing things for the event. You may have already thouth that there would be some hand made objects for the marriage, and that's true! I'm trying to prepare some things to make my guests feel the wedding have been carefully planned, as it is :-D.
After the event I'll show you all the handicrafts and of course their step-by-step.
That's all: I'LL BE BACK

domingo, 2 de junio de 2013

Collar DIY / DIY necklace

Ha amanecido un domingo precioso y yo me he levantado con ganas de crear.
Hace ya algún tiempo que vi este DIY en el blog http://www.daretodiy.com/, pero aún no lo había puesto en práctica. Así que con la creatividad al 100%, esta mañana me he puesto manos a la obra.

Today is a very nice Sunday and I woke up full of creativity.
Some time ago I saw this DIY on http://www.daretodiy.com/, but I haven't put it in practice yet. So today, with creativy at 100%, I've done it.


Lo único que necesitamos es una pistola de silicona y ganas de crear. Yo lo he pintado con laca de uñas, aunque en el original lo pintaba con spray.

You just need a sylicone gun and creativity on. I've painted it using nail polish, but the original one was painted with spray paint.

Podemos hacer cualquier forma. Para ver el tutorial pincha aquí:

To see the tutorial click below:

martes, 28 de mayo de 2013

Home made chill out

¡Hola a todos/as!
Hace algunas semanas os comenté que dejaría un poco abandonado el blog porque estaba trabajando en algunos proyectos. El primero que terminé fueron aquellos cojines por reutilización de pañuelos (hoy podréis ver de nuevo esos cojines). Bueno, pues por fin he terminado un proyecto en el que llevaba trabajando bastante tiempo, he tardado bastante porque a veces me daba pereza :-D. Se trata de un chill out hand made! Pues sí, yo solita, sin la ayuda de nadie, y con materiales muy sencillos y baratos, me he construído este lindo Chill out para nuestra terraza. ¿Qué os parece?

Hi everyone!
Some weeks ago I told you that I was going to leave a bit appart this blog, because I was working on some proyects. The first finished one was that of the beatiful coushions made out of recycled scarves (today you'll see them again). Well, I've just finished, at last, a proyect on which I was working for quite a long time, it was because sometimes I was a bit lazy. It consists on a hand made chill out! Yes, I've done all by myself, using cheap and easy materials. I've built this nice chill out by my own for one of our terraces. What do you think about?


Cómo podéis ver, simplemente con unos palets y unos colchones de gomaespuma podemos crear un ambiente chill out de lo más acogedor. ¿Te atreves a hacer el tuyo?

As you can see, with a couple of pallets and some foam, it needs to be big enough, you can have your own chill out at home. Would you do yours?

jueves, 16 de mayo de 2013

Alumnos/as que dejan huella / Students I'll never forget

No sé si lo he comentado con anterioridad, pero soy profesora de inglés, de ahí que mis entradas sean bilingües :-D.

Pues bien, se va acercando el final de curso para mis alumnos/as de 2 de Bachillerato y tengo que decir que estos chicos y chicas han conquistado mi corazón <3 y desde hace tiempo quería tener un detalle con ellos, pero no sabía muy bien qué. Hasta que mis amigas Cristina y Mariona montaron su business de galletas, Cómete el Mundo,  y entonces lo tuve claro: mis alumnos/as iban a recibir unas bonitas galletas.

I don't know if I have already mentioned but I'm an Enlgish teacher, that's why all my posts are bilingual.

The end of the year is about to come for my students of Second Year of Bachillerato and I have to say that these guys have robbed my heart <3 and it's been a long time since I've thought that I want to give them a present, but I didn't know exactly what to give. But then my friends Cristina y Mariona, from Cómete el Mundo, started their cookie business and then I've decided that my students would have a nice cookie.

En Cómete el Mundo se adaptan a todo lo que tú les pidas y yo quería que mi galleta fuera algo muy personal, por eso les pedía que me hicieran una galleta con forma de pizarra en la que además fuera una frase en inglés. La frase no es mía, me la envío una muy buena amiga, María Jiménez, y me pareció que era la perfecta para mis alumnos/as.

GO FOR WHATEVER MAKES YOU HAPPY

O lo que es lo mismo, ve a por aquello que te haga feliz. Mis alumnos/as dejan el instituto para empezar una nueva vida y creo que esta frase les puede ayudar a elegir lo que quieran para el futuro.

Cómete el Mundo adapt themselves to whatever you ask them to make for you. I knew my cookies to be very personal, so I've asked them to make a blackboard shape cookie with a nice quote on it. The quote is not mine, but from a very good friend of mine, María Jiménez.

GO FOR WHATERVER MAKES YOU HAPPY

I thought it was the perfect quote for my students now they're leaving the Secondary School to start a new live.


Aquí os enseño el resultado de cómo han quedado las galletas. Como podéis ver cuidan todos los detalles y hasta la caja es bonita. Además, yo les escribí una cartita a mis alumnos/as y ha sido incluida en cada una de las bolsitas de las galletas. Creo que ha sido un recuerdo la mar de mono.

Here I show you the final outcome. As you can see even the box in which they were delivered was a nice one. I've also written a letter to my students and it has been put inside the cookie packaging. I think it has been a cute souvenir.


martes, 14 de mayo de 2013

¿Qué hago con lo que ya no me pongo? / What can I do with clothes I'm not wearing anymore?

Hace ya algún tiempo que he tenido el blog parado, pero ya ha llegado el momento de empezar  volver a colgar cosillas.
Hoy os traigo un reuso con unos pañuelos que hacía ya bastante que no me ponía, pero me daba pena tirarlos o regalarlos, así que decidí hacer unos cojines para mi cama, porque la verdad estaba bastante sosa :-D

There has been a long time since the last time I post on the blog, but now it's time to start over and show you some things I've been doing.
Today I'm showing you a reusing with a couple of scarves which I hadn't used for a long time. So, what I've decided to do was to make some cushions for my bed, which I considered it was to simply.


Como podéis comprobar tengo una buena caja lleeeeena de pañuelos y bufandas, pero claro también es de imaginar que no los uso todos. Hace un par de días hice limpieza y saqué algunos que estaban incluso sin estrenar y otros cuya tela era bastante mona, pero que ya no usaba, así que como ya os he comentado antes me hice unos lindos cojines.

As you can see in the picture, I've got a huge box fuuull of scarves, but as you can also imagine I do not wear all of them regularly. A couple of days ago, I'd tried to put all of them in order and I found some of them which I had never worn!! I also found some whose fabric was really nice but I hadn't wear them for a big while, so as I told you before I decided to make some cushions for mi bed.


Y este ha sido el resultado. Como podéis ver encajan perfectamente con la colcha.

This has been the result! As you can see the perfectly fit with my duvet!


No he usado cremalleras, sino un sistema que deja una apertura en la parte de detrás para poder meter el cojín.

I haven't used zippers. Instead I've left a open area at the back to put the padding.

¡¡¡Espero que os hayan gustado!!!

I hope you like them!!!


lunes, 22 de abril de 2013

Reutilizando / Reusing

Cuando llega el buen tiempo, llega también el cambio de armario. Hay que dejar paso a las prendas de la nueva temporada y muchas veces esto significa deshacernos de prendas que ya no usamos. Antes de tirarlas a la basura sin más debemos comprobar si están en condiciones para que alguien pueda aprovecharlas y si están muy estropeadas, os muestro unos reusos muy interesantes.

As the good weather arrives, we also have to change the clothes on our closets. Instead of putting the old ones or those which we don't like already, it's better to make a selection among those which can be used by others, or those which are really damaged. Today I'm showing you some tips to reuse the damaged ones.


Podemos usar los bolsillos de los vaqueros viejos para hacernos unas bolsitas para transportar cosas pequeñas como el Ipod.

From the pockets of our damaged jeans we can get nice smal bags to carry our electronical items.


Con la parte de abajo de un jersey podemos hacernos estas bonitas manoplas.

With the bottom part from a  sweater we can make these nice gloves.


¿Camiseta estropeada? Simplemente con unas tijeras nos haremos este bonito pañuelo veraniego

Damaged T-shirt? With just a pair of scissors we can make this nice summer scarf


Usando los bajos de los vaqueros y un trocito de tela podemos hacer este tipo de cestita.

Using the bottom part of our jeans legs and some extra fabric we can make this kind of basket.

Gracias por las más de 2000 visitas / Thank you for the 2000 visits

Acabo de entrar en el blog y me encontrado con más de 2000 visitas, así que sólo puedo dar las gracias!!!


jueves, 18 de abril de 2013

Día de la Madre II / Mother's Day II

Ya estamos a mediados de Abril y no queda casi nada para el día de la madre. Como ya os dije en la entrada anterior sobre el día de la madre, hoy os vuelvo a dejar unas cuantas ideas originales y baratas para que sorprendáis a vuestras madres.

We've already reached mid April and Mother's Day is about to come. As I told you on the previous post about Mother's Day, today I'm also giving you sme tips to give your mum a original and cheap gift.


No sé si vuestra madre es una amante de los bolsos, la mía lo es, y estoy segura de que este organizador de bolsos fácil de hacer, le encantaría.

I don't know if your mum is a bag lover, mine is, and I'm sure she'd love this  easy to make bag organizer.


Este regalo es súper sencillo y a la vez es de lo más personal. Usando unos cuantos folios y algunas de nuestras fotos más emotivas podemos conseguir esta preciosa libretita para apuntar todas las citas.

This is a very very easy gift and at the same time it can be very personal. Using some paper sheets and some of our favourite pictures we can make this nice notebook to write down all our dates.


¿Le encanta leer? ¿Qué te parecen estos lindos marcapáginas?

Does she love reading? What about giving her this nice reading point? 


Todos tenemos un montón de llaves en casa que en realidad no sabes qué abre. Puedes adornarlas para hacer con ellas estos lindos collares o darles otros usos que se te ocurran.

We all have keys around and you really don't know what they open. You can decorate them and make these nice collars or give them any other use.


Ideas de decoración DIY / DIY decoration ideas

¡Hola a todos/as! Estoy trabajando en un par de proyectos nuevos y puede que deje algunos días de escribir en el blog, pero no quería dejaros sin avisar y poner un hasta dentro de unos días sin más no me parecía lo más correcto, así que he preparado esta entrada de decoración DIY para que vayáis pensando en qué emplear las largas tardes de verano :-D

Hi everyone! I'm working on a couple of projects and it may take me some time to write again on the blog, but I couldn't leave you with just a see you later, so I've prepared this post with some DIY decoration ideas. These ideas would be nice to do during the long summer days.


Esta ideas siempre me ha encantado. Colocar en lugar de un cabecero de cama una barra de cortina con una tela bonita y acolchada o unos cojines enganchados a la barra. En la cuarta foto, además, han añadido al cabecero unos prácticos bolsillos para poder colocar esos enseres nocturnos.

I've always love this idea. You need a curtain bar and some nice fabric or some cushions hang at the bar. On the last picture we can see that some pockets have been added in order to keep night goods at our hand


Este proyecto lo tengo en mente desde hace bastante tiempo. Me encantan este tipo de lámparas y he visto que son muy fáciles de hacer. Las cuerdas deben mojarse en cola blanca para que se pequen y mantengan la forma del globo. Además se pueden hacer con otros materiales, como papel de periódico, de esa manera después podremos decorarlas como más nos gusten.

I've been thinking about this project for quite a long time. I love this kind of lamps and I've found out that they're very easy to be done. The ropes used need to be wet with white glue in order to keep the position we give to them. We can also use other materials, such as newspaper, which can be later decorated as we like.


¡Esta última idea es sencillísima y practiquísima! Unos libros y unas escuadras y ¡tachán! Precisos estantes.

This is the easiest and most useful project ever! Just some books and framing square and voilá! You've got nice selves!


miércoles, 17 de abril de 2013

Bonitas ideas para poner la mesa / Nice ideas to set tables

Afortunadamente ya estamos disfrutando de la tan esperada Primavera, bueno puede incluso que haya llegado con más calor del que esperábamos. Pero vamos a lo que vamos que me enrollo ;-).
Esta época es ideal para recibir a los amigos en casa y hacer una barbacoa o una cenita o comida. 
Hoy os traigo varias imágenes para que dejéis a vuestros invitados con la boca abierta.

Fortunately Spring has arrived, although we're having higher temperatures than expected, but let's get the point, because I roll my mouth.
This is the best time of the year to have our friends around for a BBQ or a nice dinner.
Today I'm bringing you some images to make your ghests freak out.


En estas dos imágenes se han utilizado tanto fruta como flores para hacer cubitos de hielo. Dan sensación de fresquito y además hacen que las bebidas estén mucho más monas.

On these two pictures fruitas and flowers have been used to make ice-cubes. It makes your table to look fresh and your drinks will look much cute.


Usando unas copas y unos conos de papel podemos hacer estas preciosas lámparas con una vela en el interior.

Using some cups and cone paper we can make these nice lamps with candles inside.


Esta última idea también es genial para la velas. Sólo necesitamos decorar las tapas de los botes de vidrio y tendremos unos preciosos posa-velas.

Using the caps from glass jars we can have nice candle-holders.

miércoles, 10 de abril de 2013

Decoración DIY II / DIY decoration II

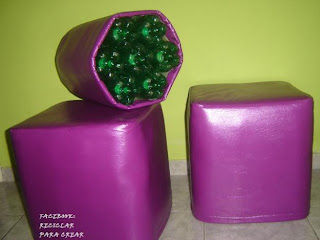
¿Os gustan los puffs? A mí me parecen geniales como asientos auxiliares. Además, quedan preciosos como objetos de decoración. Hoy os voy a enseñar tres imágenes en las que podemos ver un puff DIY. Creo que os encantarán.

Do you like puffs? I love them as auxiliary seats. Besides, they're so nice as decoration objects. Today, I'm showing you three images which show a DIY puff. I think you'll live them.


¿No os parece súper sencillo? Sólo necesitamos unas cuantas botellas, relleno y una tela que nos guste y tendremos estos preciosos puffs.

Don't you think they are so easy to be made? You just need some plastic bottles, some foam and a noce fabric to have these beautiful puff at home.

lunes, 8 de abril de 2013

Ordenar y almacenar nuestros zapatos / Tidying and organising our shoes

Hola a todos/as,

Hoy os traigo un post súper interesante para ordenar nuestros zapatos. Os voy a mostrar tres imágenes en las que podréis ver cómo podemos guardar los zapatos y además darle un toque bonito y original a nuestro hogar.

Hi everyone,

Today I'm writing a very interesting post showing how you can tidy your shoes. Here there are three images on which you can see how can we keep our shoes and also have a nice and orignal decoration at home.


En esta primera imagen, vemos como usando una estantería podemos organizar las cajas de los zapatos. Como podéis ver, éstas están forradas con papeles de colores y se ha puesto una etiqueta en la que poner el "nombre" de los zapatos.

Look at this first one, a shelf is being used to organise all the shoe boxes. As you can see, the boxes are wrapped with different coloured papers and they are given a label on which you can write your pair of shoes' "name".


Esta segunda idea es ideal para vestidores. Usando una moldura podemos mantener nuestros zapatos ordenados, aunque sólo sirve para los zapatos de tacón.

This second one is a good option for a dressing room. Using a frame we can order our shoes, althoug it only works with high heels.


Ésta es la última. Aquí se ha aprovechado un pequeño hueco en la pared para colocar un zapatero. Para cubrirlo y ocultarlo, basta con colocar una cortina bonita.

This is the last one. Here a small gap on the wall to fix a shoe holder. A nice curtain is placed in front in order to keep the shoes hidden.

ESPERO QUE OS GUSTE.

HOPE YOU LIKE IT

viernes, 5 de abril de 2013

Regalos para el Día de la Madre I / Gifts for Mother's Day I

Como cada año se acerca el día de la Madre, y a todos nos gusta tener un detalle con la persona que nos trajo al mundo, pero claro, tal y como está la vida, las noticias que escuchamos a diario, la verdad es que la cosa no está como para hacer grandes gastos. Afortunadamente, ellas, que son las que más nos quieren en este mundo, se conforman con bastante poco, la mía simplemente con que vaya a verla :-P. Bueno, pues hoy os traigo algunas ideas que además de ser bonitas les encantarán porque las habremos hechos nosotros. ¿Os atrevéis?

As every year, Mother's day is about to come, and we all like to have a gift to the person who gave us birth. But as life is going on, all the bad news about the crisis, we don't think about spending a fortune. Fortunately, they, who are the people who love us the most, are really easy to make them happy, mine just wants me to visit her :-P. Well, today I'm showing you some nice ideas which your mum will love, and at the same time you'll save money as you can make them yourselves!

Hoy os voy a mostrar algunos regalos de bisutería, que podéis regalas a las madres o alguna amiga que cumpla años.

Here you have some ideas of jewelry, which you can give to your mum or anyone else.


Con unas botellas de plástico y un poco de tela, podemos hacer estas preciosas pulseras

Using plastic bottles and some fabric we can make these nice bracelets.


Esta idea es preciosa. Con un trozo de tela, puede ser una camiseta vieja, cortamos tiras y le colocamos algunas bolitas. El resultado es un maxi-collar que quedará divino con camisetas básicas.

I love this idea. With a sheet of fabric, it could be an old T-shit, we cut it in bands and add some beads. This way you have a maxi-necklace which will look great with a basic T-shirt.


Estas dos imágenes se pueden combinar y hacer un conjunto de brazalete y gargantilla. Es tan simple como utilizar imperdibles y añadirle pequeñas cuentas. Después sólo tendremos que unir los imperdibles mediante una cinta o una gomilla. Queda presioso y no se sabe de qué están hechos.

These two images can make a nice couple for a gift. A bracelet and a necklace make out od safety pins and beads. After putting all the beads on the safety pins, we need a ribbon to join all the safety pins and voilá you've got a nice collar and bracelet. 


Para este último proyecto quizás necesites algo más de paciencia. Consiste en un maxi-collar Necesitarás: papel, sobre el que sacarás el patrón del collar, un trozo de fieltro, que cortaremos de la misma forma que el patrón de papel, y algunas perlas, que irán pegadas al fieltro. Para terminar anudaremos nuestro collar con un trozo de lazo.

For this project you need some more patience. It consists on a maxi-collar. You'll need some paper, to make the pattern, then some felt, on which you'll cut the same shape as the pattern, and some pearls, they can come from a long necklace. To end the project you'll also need some ribbon to tie it around your neck.

ESPERO QUE OS HAYAN GUSTADO ESTAS IDEAS. PRONTO OS ENSEÑARÉ OTRAS.

I HOPE YOU'VE LIKED THESE IDEAS. SOON I'LL SHOW YOU SOME MORE.

miércoles, 3 de abril de 2013

Tarta de pañales para Nachito / Diaper cake for Nachito

En mi familia estamos esperando la llegada del pequeño Nachito y pensando qué podía regalarle, se me ocurrió hacer una tarta de pañales. De esta manera conseguía dos cosas: un regalo original y útil y una entrada para mi blog :-D.
Así que hoy os traigo el paso de paso para hacer una tarta de pañales y el resultado final. Espero que os guste.

We are waiting for little Nachito, and as I was thinking about his welcome present the idea of a diaper cake came to my mind. And so, I got two goals: a nice and useful present for Nachito, and a new post for my blog.
And here you've got the steps to make the diaper cake and the final outcome.

¿Que necesitas?
- Un paquete de pañales
- Una base para tarta (o un círculo hecho de cartulina)
- El tubo de cartón de un rollo de papel de cocina
- Gomas
- Cinta adhesiva
- Cintas para regalo o de lazo.
- Papel celofán

What do you need?
- Diapers (I used 80)
- A cake tray (one made out of cardboard)
- The cardboard tube from a paper towel roll
- Rubber bands
- Tape
- Ribbons
- Cellophane


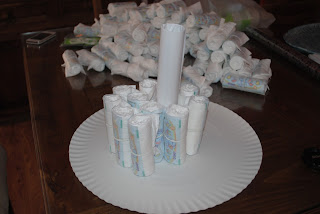
Lo primero que tenemos que hacer es enrollar los pañales. Y los sujetaremos con las gomas. Lo ideal es ponerlas hacia la mitad, ya que después las ocultaremos con la cinta decorativa.

First of all, you have to roll the diapers. We'll hold them using the rubber bands. Try to put them in the middle, in order to hide them later using the ribbons.


 Una vez que ya tenemos todos los pañales enrollados, cogeremos el rollo de cartón de papel de cocina y lo uniremos a la bandeja de cartón. Yo lo forré con un folio blanco para que quedara algo más bonito

Once we've rolled all the diapers, we have to join the cardboard roll and the cardboard tray. I've wrapped the tube with white paper in order to get it nicer. 


Ahora es el momento de rellenar la bandeja con los pañales enrollados. Hay que ir colocándolos alrededor del rollo de cocina. Yo usé 68 pañales para la primera capa. Uniremos los pañales usando una de las cintas decorativas.

Now, it's time to fill the try by putting all the rolled diapers around the paper tube. I've used 68 diapers for the first layer. And you have to join them using one of the ribbons.


Una vez que hayamos completado la primera capa, haremos lo mismo con la capa de arriba, aunque esta vez será más pequeña. mi segunda capa sólo tiene 12 pañales, aunque después le añadí 6 bodies enrollados de la misma manera que los pañales. Cuando terminéis la capa de arriba pondremos más cinta decorativa para unir los pañales.

Once you've filled the first layer, you've got to do the same with the top layer, but this time it'll be smaller.My top layer got only 12 diapers, but later I added 6 bodies rolled as the diapers. As soon as you finish the top layer, you have to join the diapers with some more ribbon.


Estas fotos muestran como queda una vez que ya hemos hecho las dos capas de la tarta y además hemos colocado los diferentes regalitos que queremos añadir.

These pictures show the cake once we've got all the diapers set and we've put all the gifts we want to add.


Después rodee la capa superior de la tarta con una mantita. Algunos de los regalitos que añadí son unas perchas, un sonajero, un biberón, un porta alimentos, dos pares de calcetines, unos bodies, una cucharita, un gorrito y unas manoplas.

Later I wrapped the top layer using a small blanket. I've also added some presents as I told you before, such  as some hangers, a little spoon, some bodies, a rattle, a baby botle, two pairs of shocks, a small hat and gloves.


¡Tachán! Este es el resultado final. Una vez envuelta con el papel de celofán y una lazada en la parte superior. Espero que os guste y que os pongáis manos a la obra para hacer vuestro regalo.

Here we are! Once wrapped with cellophane paper I tied some ribbon at the top. I hope you liked it and now you're thinking about doing one yourself.